The NTOSKRNL.exe file is a kernel image responsible for various system-based processes, including hardware virtualization, Process Management, and Memory Management. Among these, it is also responsible for compressing the old pages of memory which reduces the overall amount of memory being used. There is a chance that if your computer is running slowly and you find NTOSKRNL.exe consuming resources like CPU Usage, Disk Usage, and Memory Usage, then you need to take a look at a few things. Normally, this process uses less than 30% of CPU, but in case that is constantly up, then this post will help you.

Fix NTOSKRNL.exe high CPU, Memory & Disk usage in Windows 11/10
NTOSKRNL stands for NT Operating System Kernel. So, in order to fix it, we need to undertake one of the following fixes,
- Scan your computer for potential malware
- Remove incompatible programs
- Run DISM to repair system image
- Stop the Runtime Broker process
- Update your Drivers
- Run Performance Troubleshooter
- Troubleshoot in Clean Boot State
- Use Windows Performance Toolkit to find the root cause.
1] Scan your computer for potential malware
There might be a good chance that your computer might be infected with malware. This malware may be associated with the NTOSKRNL.exe file, which can cause it to consume a significant amount of system resources. So, I would really recommend you to make sure that your Antivirus is up to date and then scan your computer with it, specifically the C:\Windows\System32 folder, because this is the location where the NTOSKRNL.exe file is located.Advertisements
2] Remove incompatible programs
Installing and running incompatible programs might also trigger such unusual behavior with system files. There might be instances when to execute a particular sub-task inside of the major task. Hence, it might be stuck in a loop and end up hogging up system resources. Hence, it is recommended to uninstall such software and check if the issue is resolved.
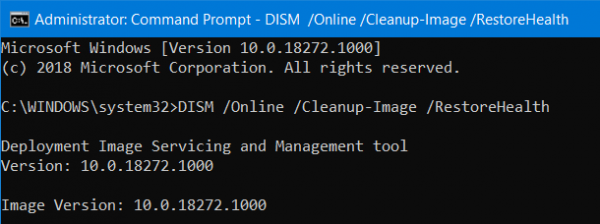
3] Run DISM Command

When you run DISM (Deployment Imaging and Servicing Management) tool, it will repair Windows System Image and Windows Component Store. All of the system inconsistencies and corruptions should be fixed. You can either use Powershell or the command prompt to execute this command.
4] Stop the Runtime Broker process
RuntimeBroker.exe monitors access to Windows API’s and ensures that apps do not violate the core security of Windows. RuntimeBroker.exe normally leaves very a small footprint. In some cases, RuntimeBroker.exe may consume more resources but does not release memory after the work is done, resulting in a memory leak. This affects NTOSKRNL.exe.
Press Ctrl+Shift+Esc to open the Task Manager. Locate Runtime Broker under the Processes tab. If it’s using more than 15% of your memory, you probably have an issue with an app on your PC. In this case, you need to stop the Runtime Broker process. Select it, right-click on it and then click on End Task.
See if this helps.
5] Update your Drivers
The incompatibility between the Operating System and the Driver might also give rise to issues like this. So, you can try to Update your drivers. You can also try to Update your copy of Windows. This will help you fix any bad sectors created by any intended or unintended task executed on the computer. Hence, keeping Windows up to date is highly recommended, as it reduces the possibility of numerous errors.
6] Run Performance Troubleshooter
Open Run box, type the following and hit Enter:
msdt.exe /id PerformanceDiagnostic
This starts the Performance Troubleshooter. Run it and see if it has any issues to fix.
You could also adjust Windows for best performance and see if that works for you.
7] Troubleshoot in Clean Boot State
You can troubleshoot further manually by performing a Clean Boot. A Clean Boot starts a system with minimal drivers and startup programs. When you start the computer in clean boot, the computer starts by using a pre-selected minimal set of drivers and startup programs. Because the computer starts with a minimal set of drivers, some programs may not work as you expected.
Clean-boot troubleshooting is designed to isolate a performance problem. To perform clean-boot troubleshooting, you must disable or enable one process at a time, and then restart the computer after each action. If the problem goes away, you know that it was the last process that was creating the problem.
8] Use Windows Performance Toolkit to find the root cause
You might need to use the Windows Performance Toolkit to find the root cause of this issue. Open Command Prompt by searching for cmd in the Cortana search box or hit WINKEY+R to launch the Run utility and type cmd and hit Enter.

Now, type in the following command, and hit Enter:
xperf -on latency -stackwalk profile -buffersize 1024 -MaxFile 256 -FileMode Circular && timeout -1 && xperf -d cpuusage.etl
Wait for at least 60 seconds for this command to run.
Now check the logs of this Windows Performance Toolkit. They are stored in a file named as cpuusage.etl in the C:\Windows\System32 folder.
This will list all the causes of this System Resources being hogged.
How do I fix NTOSKRNL.exe high CPU usage?
NTOSKRNL, or the NT Operating System Kernel, consumes more CPU resources than usual at times. If it is happening with you on your computer, you need to scan your PC for malicious files, viruses, malware, etc. Apart from that, you can uninstall or remove unnecessary programs, run the DISM tool, update your drivers, etc. If nothing helps, you can troubleshoot in the Clean Boot State as well.
How do I turn off NTOSKRNL.exe?
It is not possible to turn off the NTOSKRNL.exe process on your Windows 11/10 computer. It is an internet service and turning it off might cause several problems on your PC. As it is responsible for providing a smooth experience while using hardware virtualization, memory, and other processes, your computer may exhibit various issues after stopping or turning off this process.